|

Background
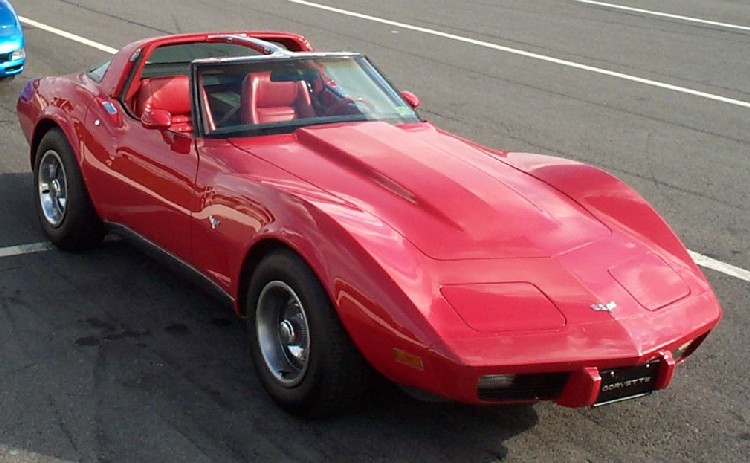
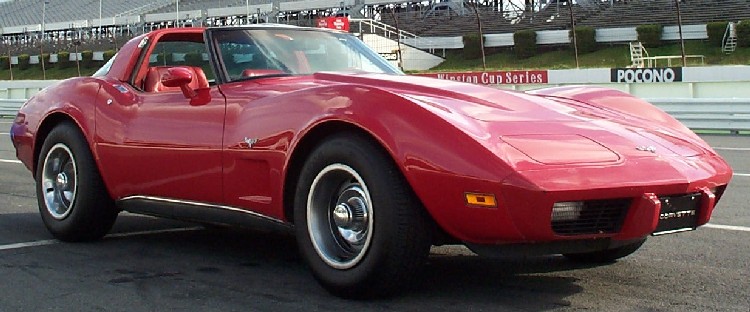
Purchase: I purchased a 1979 T-Top in May of 2001. I purchased
her in New Mexico and drove her home to Pennsylvania. Exterior:
She had been living on a dirt road for many years which took a major toll on
the suspension. She also was exposed to too much sun and there are spots
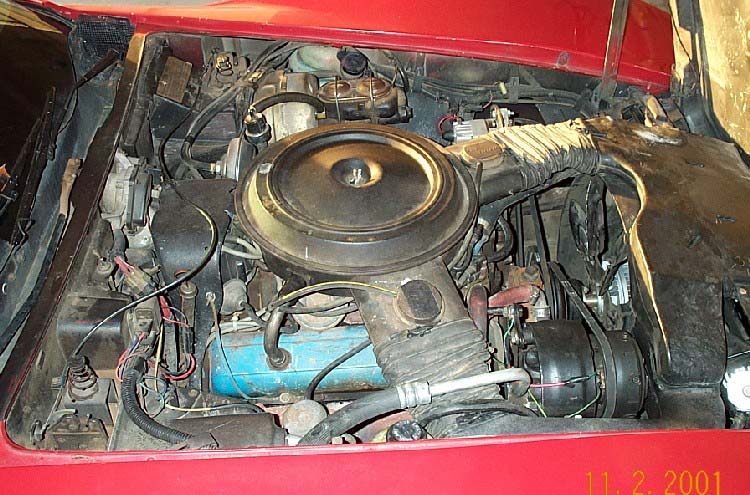
on the exterior where the paint has faded to white. Engine: The
engine ate oil so often that it needed 1 to 2 quarts added at each refueling.
The oil was being consumed by the number 2, 6 and 8 cylinders which caused the
plugs to foul and need replacement every 100 miles or so. The factory
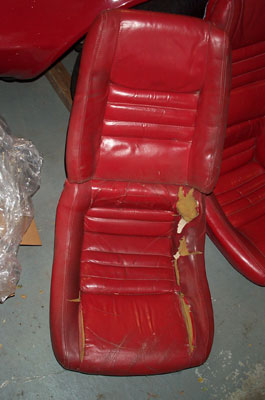
installed A/C does not work. Interior: The seats, especially the
driver's, are faded, torn and have foam coming out. The carpets are ripped
and dirty, the dash is faded and cracked. The door panels are falling
apart and are also faded. The speedo/tach cover is cracked and squeaks
while driving. The heater/ A/C temp control won't stay all the way to the
left.
The Plan: Restore the car to an almost new condition, starting with
the engine.
The Log: The log you see below details each specific day that I either
do something to the car myself, or have something done by someone. The
days are not necessarily consecutive because I can't spend every day working on
it. So as things get done to it, I will post the details here.
Progress Log
Click a day: Day 1, Day 2,
Day 3, Day 4, Day 5,
Day 6,
Day 7,
Day 8,
Day 9,
Day 10,
Day 11,
Day 12,
Day 13,
Engine "After" Pictures,
Seat
before/after pictures, 4/2003,
6/6/03, 9/12/03, 10/3/03
Day 1 - 11/2/2001 - See detail
For those of you that may be interested, I am ripping out the original engine
from my 1979 Coupe. It has 92,000+ miles on it and has been eating oil,
leaking oil, burning oil, fouling plugs and all kinds of mean, nasty, ugly things!
I plan to document the procedure of its removal and rebuild or
replacement. I haven't figured out what I'm going to do just yet, but I'm
leaning toward the replacement so I can gain some much needed horse-power! The '79
came with a 195hp, 350ci. I could stand to have more like 350hp!
So follow along, if you dare, and share your thoughts and comments in the
forums.
Day 2 - 2/24/2002 - See detail
I got everything out of the engine compartment that I need to in order to
get that engine out of there.
I ordered a new LM1 (350ci/249hp) short-block to put in place of the original
L-48 that is in there.
I plan to have the old one out and the new one in on 3/23/2002!!
Day 3 - 3/16/2002 - See detail
I spent some time cleaning up the main components and repainting them.
Boy, what a difference a wire brush and some spray paint can make!! I
bought some 1500 degree engine paint. The directions said to "cure" it by
baking the sprayed parts. Here's a tip: don't put your manifold
in you kitchen oven! The oil left inside smoked up the whole place and set
off the smoke detectors! The house still smells like oil!
Day 4 - 3/24/2002 - See detail
While we were under the car, we figured we'd put the new trans filter and
trans pan back on. That went fine till I realized there is a gasket
that should have been installed between the filter and the trans!!! So, the pan came back off,
and we put the dumb gasket in, and put the pan back, AGAIN. I rented the
engine hoist. Did a damn fine job for $29! With some assistance hoisted,
shaking, pulling, and some more shaking, we got the engine out! Turns out
the left motor mount was split in half, so we didn't put the new engine in yet.
For one thing, this gives me a chance to clean the engine compartment and
perhaps paint it. Also, the crate engine didn't come with a dipstick tube,
so I tried taking the one off the L-48 and wound up breaking it off the block.
Oops. So, sometime in the next couple of weeks I'm gonna get in there,
clean things up, get the new mounts in and lower in the new girl!
Day 5 - 4/21/2002 - See detail
Rented the engine hoist, again. This, in itself, was a major hassle
this time! I called the rental place on Friday and said "I need to reserve
an engine hoist for pickup on Saturday." The moron at the other end said
"we have three of 'em, just come in." Not having learned my lesson yet, I
said "OK." So you can probably guess where this is going... I went in on
Saturday and said "I need to rent an engine hoist, again," guy says, "let me see
if I have one." I knew that wasn't a good sign! He came back and
said, "don't have any left." I told him "that really pisses me off
because..." and told him the whole story of the phone call the day before and
showed him the 8x10 colored glossy photographs with circles and arrows and a
paragraph on the back of each one, explaining what each one was. Tip Number
1: Get the name of the guy you talked to on the phone. Tip Number
2: Make sure he actually reserves what you need, don't trust the "oh, just
come in" line. So, he said he'd check his other location (20 minutes away)
to see if they have one there. Fortunately, they did. So back in my
truck I go to the other store, bitching to myself the whole way what a bunch of
crap this whole situation was, and how I couldn't believe I had to drive all the
way to this other place to get the hoist that they told me they'd have in the
first store!
Enough about that... so we hoisted the LM1 up, pushed it over the engine
compartment and lowered her in. (Yeah, like it was that easy.) Once
we lowered her into place, getting the torque converter to line up with the
trans was quite an adventure. It took us about 20 minutes of "lower it a
little, now push, now wiggle... alright, lower it some more, push... go up,
push..." and so on. Alas, we got her in place! Next was attaching
the motor mounts to the block and the frame which took about 45 minutes, the
first 15 being spent figuring out where the bolts got to! Tip Number 3:
don't get lazy... label EVERYTHING! I labeled most parts & bolts as
they came out, but I never labeled the motor mount bolts, so first we couldn't
find them, then when did, we weren't sure if they were in fact the motor mount
bolts.
So, with the motor mounts on, we attached the exhaust manifolds, then the intake
manifold. And that took us to the end of Day 5.
Day 6 - 5/9/2002
I decided that I can not finish the engine installation myself! Because
I don't have the time, and I don't have the know-how to make sure that
everything gets put back the way it should and have a correctly running engine.
So had her towed to my mechanic in hopes of getting her running soon.
Day 7 - 5/15/2002
So it's now in the hands of my mechanic.
As you may have read in another post, it may take as much as 2 weeks for him to
get it done. Not 2 weeks of labor, enough free time over 2 weeks to do work on
it. He's "fitting it in" between other "scheduled work." I don't know why mine
can't be considered scheduled.
Anyway, the fuel pump was leaking upon arrival to his shop, (actually it was
leaking as it left my garage), so he's got a new one now. He's said he's got it
up in the air, but hasn't really done anything else.
I gave him all the parts in the back of the Vette, so he says he's got to
inventory all of it, then it goes under the car while he works on it. He said he
can't do the inventory until he has had a chance to look at the underside
thoroughly.
Day 8 - 5/16/2002
He called me this morning to tell me the bad news...
He couldn't get the engine to turn because the transmission is seized.
I killed the converter putting the new engine in place.
So now it's got to be towed to a trans place to get the trans rebuilt before my
guy can continue to finish the engine. Which may also be dead. He said the
crankshaft was pinned too far back and may have ruined the engine.
Note to self - never install an engine myself.
Day 9 - 5/21/2002
Well, just heard from the Trans place...it basically is going to be rebuilt,
and a new Torque Converter put in.
For the low low price of just 1100 bucks!
Day 10 - 5/31/2002
Well, I just checked with my mechanic to see what the status was.
To make an annoying long story short, he can't even promise me it will be done
by June 25th. That's right, you read that correctly... JUNE 25th He
considers my car "filler work" and only works on it while he has nothing else to
do. I even offered more money, he didn't care.
So now, I have to take it to a 3rd shop to get finished. And he said he can't
start it till next week, but should be able to work on it more steadily than the
other guy. So he thinks that June 25th is reasonable, but he of course has not
yet seen it, so can't really be sure.
I WANT MY CAR BACK! The summer is gonna be over by time I get it back! I wanted
it by this Saturday for a neat cruise CCDV is doing, but that's out! I wanted it
by June 12th for the C3VR Hooters Cruise, but that's probably out! I wanted it
by June 13th for the next CCDV meeting, but that's probably out. The next time I
REALLY need it is June 25th to head the C3VR Caravan to Bowling Green. If I
don't have it, I may as well cancel the caravan!
ARRRRRRRRRRRRGGGGGGGGGGGGG!!!!!
Day 11 - 6/13/2002
My mechanic just called.... it runs!!
It really runs!! My baby has been re-born! Her re-birth cost $1200.
I pick it up tomorrow at 9am, gotta run it over to the Trans place first so they
can do their final inspection... then its out to the open road, baby!!
He also told me that the right-rear bearing seal is starting to leak, and I
that I should have it replaced before I go to Bowling Green.
Look for my wave as "79 VETT" goes past ya!!
Day 12 - 6/14/2002
I picked her up this morning! She runs and sounds great! As soon
as I get some pictures of the new engine in place, I'll post them here!
Day 13 - 6/18/2002
I took her on a business trip with me. As I left, I noticed a coolant
leak! While I was there, I took her to a Chevy dealer to have them replace
the right-rear bearing seal (as recommended by my mechanic on
Day 11) and to have them check out the new coolant leak I found.
On the bright side, they said the bearing seal isn't leaking. It just
has a little seepage, but it is normal.
On the dark side, the coolant leak was a hole in my radiator! I'm
guessing I damaged it while struggling to get it out on Day 2.
So that had to be replaced to the tune of $400.
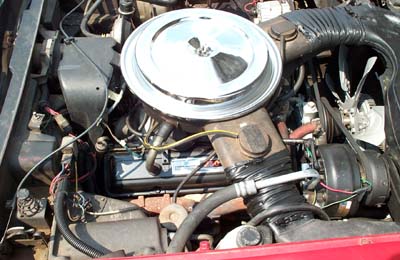
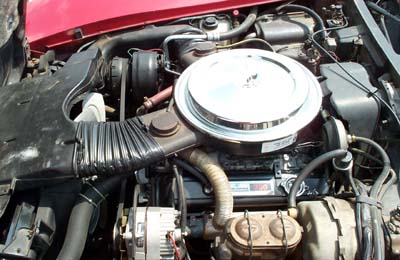
Engine "After" Pictures
I finally got around to taking pictures of the new engine in place.
Click on a link below to see the pictures:
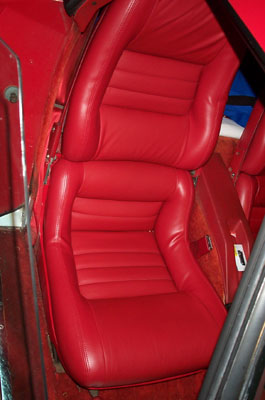
Seat Before/After Pictures
I finally got around to taking pictures of the seats. As you can seat, the
one was in especially bad shape when I bought the car. I think you'll
agree, they look MUCH better now!
Click on a thumbnail below to see a larger version pictures:
| Seat Before |
Seat After |
 |
 |
4/2003
Brake Calipers were rebuilt using new O-Ring Caliper Pistons.
Brake Pads were replaced.
6/6/2003
Radiator replaced.
Thermostat replaced
Washer Bottle replaced
9/12/2003
Turn signal switch pivot assembly was replaced.
10/3/2003
Had the following work done by a Corvette only shop:
Replace 4 brake hoses
Replace strut rod bushings
Replace EBrake using Kit
Replace lower control arm bushing
Replace t-top weather-stripping on both sets of tops, adjust to be water-tight.
A couple of exterior shots before any restoration started...
(click pics for larger image)


|
|
|
