
Topic: U-Joint installation
in Forum: C3 Driveline Components
Already a Member?
Click Here to Login
Not yet a Member?
Click Here to Register for Free!


During the Baseball game rain delay I went out to the shed and did the removal and installation of the u-joints in the drive shaft. I took pictures so I could share them with anyone that needed them. Keep in mind there are many different methods that people use to do this operation. This is just one of them. Many use a torch but since my shed is made of wood I thought that wasnt the best choice. Wood and fire just dont mix very well! 
http://i1014.photobucket.com/albums/af270/rod7515/U%20joint%20install/PA094437.jpg
This is the tool I use. Its actually my ball joint removal / installation tool as well for trucks. Probably one of the best tools I ever bought and its just under a $100!
http://i1014.photobucket.com/albums/af270/rod7515/U%20joint%20install/PA094438.jpg
I spray the end cap clips with a good penetrating oil(they rust tight). Then I use a screw flat blade driver to tap the ends loose.
http://i1014.photobucket.com/albums/af270/rod7515/U%20joint%20install/PA094439.jpg
Once the clips are loose I remove them using a needle nose pliers.
http://i1014.photobucket.com/albums/af270/rod7515/U%20joint%20install/PA094440.jpg
I use a spacer that allows me to push the joint over about 1/16th". Once the joint moves I remove it and just use my clamp to push it the rest of the way as you can see in the next pic.
http://i1014.photobucket.com/albums/af270/rod7515/U%20joint%20install/PA094442.jpg
Clamp is now in place and ready to push the joint. I begin to tighten the clamp which pushes the joint in the opposite direction. If using a standard c-clamp you may need to use a deep well socket to allow the cap to come out the other side.
http://i1014.photobucket.com/albums/af270/rod7515/U%20joint%20install/PA094443.jpg
The cap may not come out completely while using the c-clamp because the joint bottoms out on the shaft. As you can see in the next pic I just use a vice grip to pull it off the rest of the way.
http://i1014.photobucket.com/albums/af270/rod7515/U%20joint%20install/PA094444.jpg
As you can see the cap is easily removed from the shaft with just a vice grip once you have pushed it out using your clamp.
http://i1014.photobucket.com/albums/af270/rod7515/U%20joint%20install/PA094445.jpg
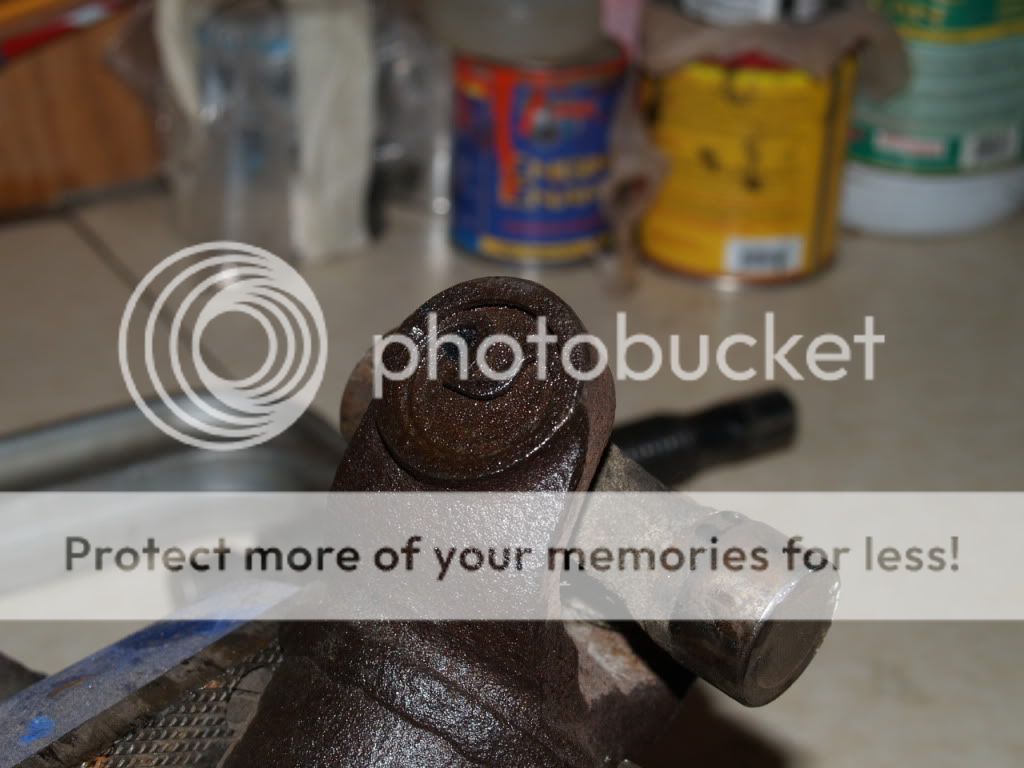
Once the first cap is removed i roll the driveshaft over positioning the u-joint into my vice a tap the joint back the other way using a hammer and just tapping on the weld on the drive shaft. You can see the light brown spot on the weld where I am tapping. I dont have to use a lot of force or beat very hard on the shaft. If the joint is tight and dont want to come out using this method then go back to the c-clamp to drive it out.
Once the u-joint is out I reverse the procedure to put the new joint back in. Since I do this often I usually dont use a clamp to reinstall the new joint. I use only a hammer and feel! When installing the new joint you must install the joint before any caps. Once a cap is installed the joint wont fit in! The safest way is to start the first cap into the shaft with the joint already in the cap, then use your vise to squeeze the cap in farther. Next take your c-clamp and drive the cap into the shaft, you will need to use a socket to push the cap past the c-clip retainer area. By doing this you will allow the next cap to engage over the u-joint. This will keep the bearing pins in place. Next I install the c-clip in the opposite end then push the joint back into the shaft until it touches the c-clip on the other side. Then install the last c-clip. The joint will be tight in the shaft at this time so I always hit the shaft at the cap ends to release the tightness. This allows the joint to center itself and becomes loose. Now install the shaft and off for a drive.
HELP!!! Not sure what Im doing wrong that the pics wont come up, maybe Joel or someone can fix it and let me know why its not working. I think this is the way I did it in the old forum?
Rodney
(inserted live links-aapple)
|UPDATED|10/9/2011 8:30:53 AM (AZT)|/UPDATED|
http://i1014.photobucket.com/albums/af270/rod7515/U%20joint%20install/PA094437.jpg
This is the tool I use. Its actually my ball joint removal / installation tool as well for trucks. Probably one of the best tools I ever bought and its just under a $100!
http://i1014.photobucket.com/albums/af270/rod7515/U%20joint%20install/PA094438.jpg
I spray the end cap clips with a good penetrating oil(they rust tight). Then I use a screw flat blade driver to tap the ends loose.
http://i1014.photobucket.com/albums/af270/rod7515/U%20joint%20install/PA094439.jpg
Once the clips are loose I remove them using a needle nose pliers.
http://i1014.photobucket.com/albums/af270/rod7515/U%20joint%20install/PA094440.jpg
I use a spacer that allows me to push the joint over about 1/16th". Once the joint moves I remove it and just use my clamp to push it the rest of the way as you can see in the next pic.
http://i1014.photobucket.com/albums/af270/rod7515/U%20joint%20install/PA094442.jpg
Clamp is now in place and ready to push the joint. I begin to tighten the clamp which pushes the joint in the opposite direction. If using a standard c-clamp you may need to use a deep well socket to allow the cap to come out the other side.
http://i1014.photobucket.com/albums/af270/rod7515/U%20joint%20install/PA094443.jpg
The cap may not come out completely while using the c-clamp because the joint bottoms out on the shaft. As you can see in the next pic I just use a vice grip to pull it off the rest of the way.
http://i1014.photobucket.com/albums/af270/rod7515/U%20joint%20install/PA094444.jpg
As you can see the cap is easily removed from the shaft with just a vice grip once you have pushed it out using your clamp.
http://i1014.photobucket.com/albums/af270/rod7515/U%20joint%20install/PA094445.jpg
Once the first cap is removed i roll the driveshaft over positioning the u-joint into my vice a tap the joint back the other way using a hammer and just tapping on the weld on the drive shaft. You can see the light brown spot on the weld where I am tapping. I dont have to use a lot of force or beat very hard on the shaft. If the joint is tight and dont want to come out using this method then go back to the c-clamp to drive it out.
Once the u-joint is out I reverse the procedure to put the new joint back in. Since I do this often I usually dont use a clamp to reinstall the new joint. I use only a hammer and feel! When installing the new joint you must install the joint before any caps. Once a cap is installed the joint wont fit in! The safest way is to start the first cap into the shaft with the joint already in the cap, then use your vise to squeeze the cap in farther. Next take your c-clamp and drive the cap into the shaft, you will need to use a socket to push the cap past the c-clip retainer area. By doing this you will allow the next cap to engage over the u-joint. This will keep the bearing pins in place. Next I install the c-clip in the opposite end then push the joint back into the shaft until it touches the c-clip on the other side. Then install the last c-clip. The joint will be tight in the shaft at this time so I always hit the shaft at the cap ends to release the tightness. This allows the joint to center itself and becomes loose. Now install the shaft and off for a drive.
HELP!!! Not sure what Im doing wrong that the pics wont come up, maybe Joel or someone can fix it and let me know why its not working. I think this is the way I did it in the old forum?
Rodney
(inserted live links-aapple)
|UPDATED|10/9/2011 8:30:53 AM (AZT)|/UPDATED|

SPONSOR AD:: (Our Sponsors help support C3VR)

Moderator
Duncanville, TX - USA
Joined: 11/8/2003
Posts: 20218
Vette(s): #1-1974 L-48 4spd Cp Med Red Metallic/Black deluxe int w/AC/tilt/tele./p/w-p/b/
Am-Fm/map light National/Regional/Chapter NCRS "Top Flight"
#2-1985 Bright Red/Carmine Cp.L-98/auto
Member: NCRS, NCRS Texas, Corvette Legends of Texas
It's irritating as he!! ain't it? 
With the "new" software, we can't add the forum tags like we could before...no "text" links OR thumbnails. Everything has to be normal links now. Maybe eventually, it'll get back to the way it was, but it's gonna be a while, yet.
To insert a link, either for pics, or another site, forum post, whatever, you'll need to use the LINK button at the top of the reply box. Same with loading an image, but you need to use the
  IMAGE button. This adds several steps to posting a link or pic in the forums....it's a PITA, but it's all we got at the moment. Hang in there....
Good post/tutorial on the u-joints, too, btw!
With the "new" software, we can't add the forum tags like we could before...no "text" links OR thumbnails. Everything has to be normal links now. Maybe eventually, it'll get back to the way it was, but it's gonna be a while, yet.
To insert a link, either for pics, or another site, forum post, whatever, you'll need to use the
Good post/tutorial on the u-joints, too, btw!
Joel Adams
C3VR Lifetime Member #56 ![]()
My Link 
(click for Texas-sized view!) NCRS
"Money can't buy happiness -- but somehow it's more comforting to cry in a CORVETTE than in a Kia"
Waiting to see the photos, very good thread. Most times the pressure on the u joint is not released by tapping the yokes and the joint will fail early from binding.
http://i80.photobucket.com/albums/j199/64elcamino/77%20Nova%20project/Ujointinstall.jpg
http://i80.photobucket.com/albums/j199/64elcamino/77%20Nova%20project/Ujointinstall.jpg
Joel,
Thanks for taking the time to fix the pics. Took me about 3 1/2 yrs to finally learn how to post pics in the other format now I have to learn something else new! I miss the old format! Anyway thanks for fixing this.
Phillip, Good follow up with the arrows. Not sure how to do that but it shows exactly what I was saying.
Thanks Again.
Rodney

Good Job, Rodney! You have it ready for Corvettes for Chip? 

Barry


Thanks for the tips and photos! doing mine this weekend on my red 79 C3. Should solve the strange clunk in the back end. FYI - I put the car up on a lift, and on the one side it was clearly loose joints, but the other side felt fine and you could even roll the wheel without any apparent play. Decided to pull both shafts anyways - once the other shaft was out of the car, I could feel that it had some looseness in the joints and when disassembled it was worn. So, I would advise to always do both sides at the same time.
Next little piece of advice is while you have the halfshafts out, go ahead and get one of the spiffy wheel bearing grease tools (about 15 bucks) at Riks Vette or Midamerica. You have already done the tough part and all that is left is to pull the castle nut off and you can squirt some grease into those difficult to lube bearings. If yours is like mine, it probably hasn't had that in a few years (decades) and you need to pull the shafts to do this little job. Might save you a spindle replacement down the road.
Of course, since I was at it, it seemed like a good idea to cut off the exhaust system to improve accessibility, and since that was off, I may as well get a new one (nice chambered exhaust) to replace it. Solved several problems all at once.
|UPDATED|11/3/2011 5:00:53 PM (AZT)|/UPDATED|
|UPDATED|11/3/2011 5:00:53 PM (AZT)|/UPDATED|
C3: 1979 Corvette Coupe, Auto, L-48, Red/Doeskin (my wife's fave);
C4s: 1986 C4 coupe (SCCA road race car), satin black, 4+3, Z51 package, L-98; & 1993 C4 coupe, white, 6-speed, LT-1.
in Forum: C3 Driveline Components
SPONSOR AD: (Our Sponsors help support C3VR)